If you need to go through an overview of the Manual camera settings of the DSLRs, use the following link: https://photographywithtiffany.photo.blog/classwork/camera-settings-and-exposure/
Today we are practicing changing the settings, in particular the shutterspeed.
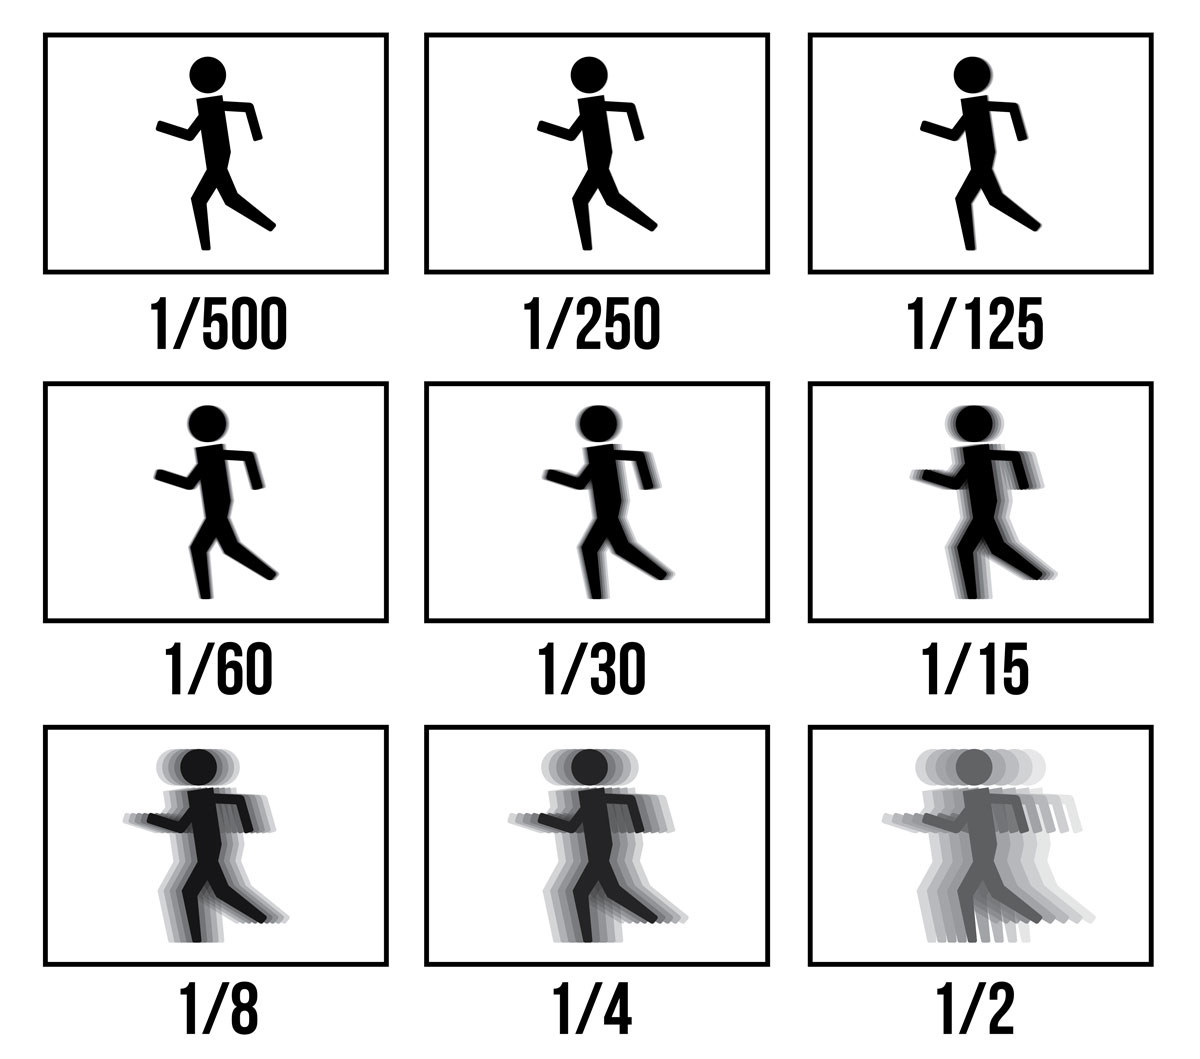

Using the cameras TV MODE (you set the shutterspeed, the aperture is on auto)
Create a series of photos like below to illustrate the difference shutterspeed changes have on a subject in an image. Label them with the settings and add to your Behance Visual Diary.
Tennis ball – Fast Shutter Speed

Camera Settings
– Canon users set mode dial to “Tv” mode (Nikon users to “S”). Basically we will shoot in Shutter priority mode as we need to have control on Shutter speed.
-ISO -> 200 or 400 depending on available sunlight. Early morning or late afternoon will be good time as sunlight won’t be too harsh assuming you are shooting in outdoors.
– Shutter Speed – Start with 1/2000 Sec can go up to 1/4000 Sec. Most of the entry level DSLR’s support only up to 1/4000 Sec. Faster speed produces better results. In case you have higher end cameras you can go faster like 1/8000 Sec.
Preparation before shooting
– Now ask your friend/volunteer to make the tennis ball wet by soaking in the bucket filled with water.
– You should stand or Sit at comfortable distance from the bucket. I suggest 8 to 10 feet.
– How to Spin and Toss the ball – please refer attached photo “How to Spin”.
– Spinning the ball is a skill so you may need to practice few times before you start clicking.
Focusing the Ball
– Focusing is the KEY or hardest part. The ball is moving and its difficult to focus after it is tossed in the air.
– We have to lock the focus before ball is tossed in the air
– Locking focus is nothing but keep the shutter half pressed (you hear beep)
– You need to focus either on bucket or on the hand of the person who is going to toss the ball.
– Very Important – Camera will focus in Vertical Plane (for given “f” number) hence ball should be tossed in vertical direction. If it drifts in horizontal direction your shot will turn Out-of-focus.
– Where to Focus and How to Toss the ball – refer below photo for better understanding.

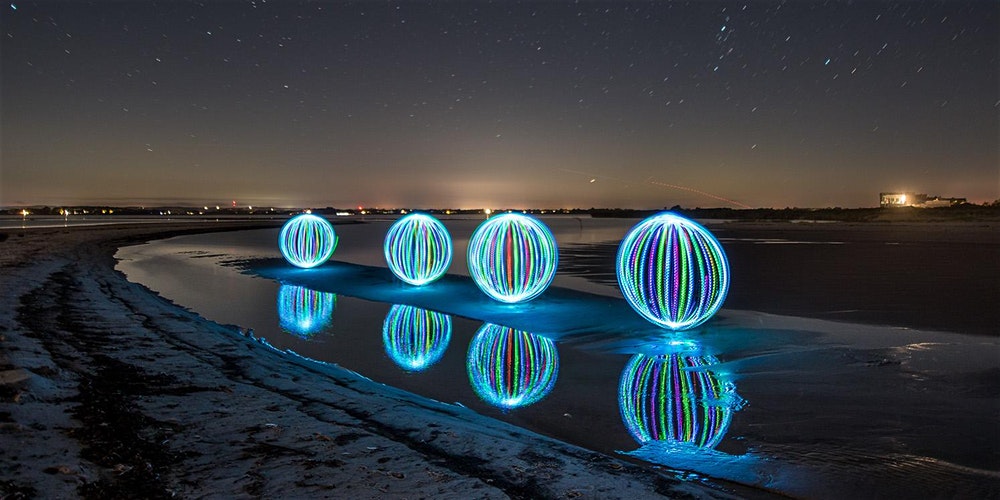
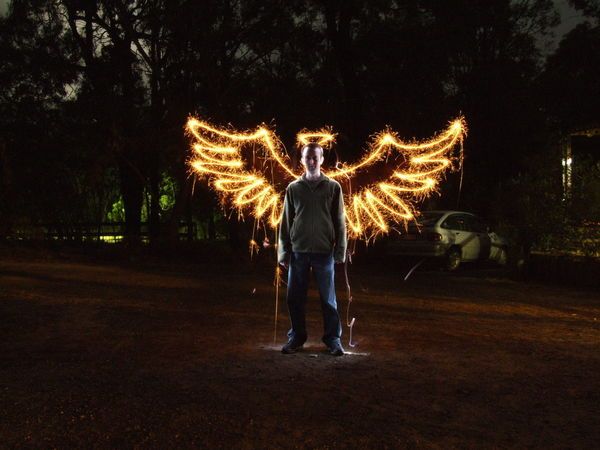
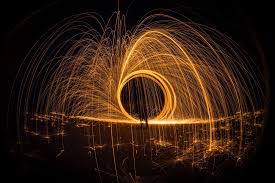
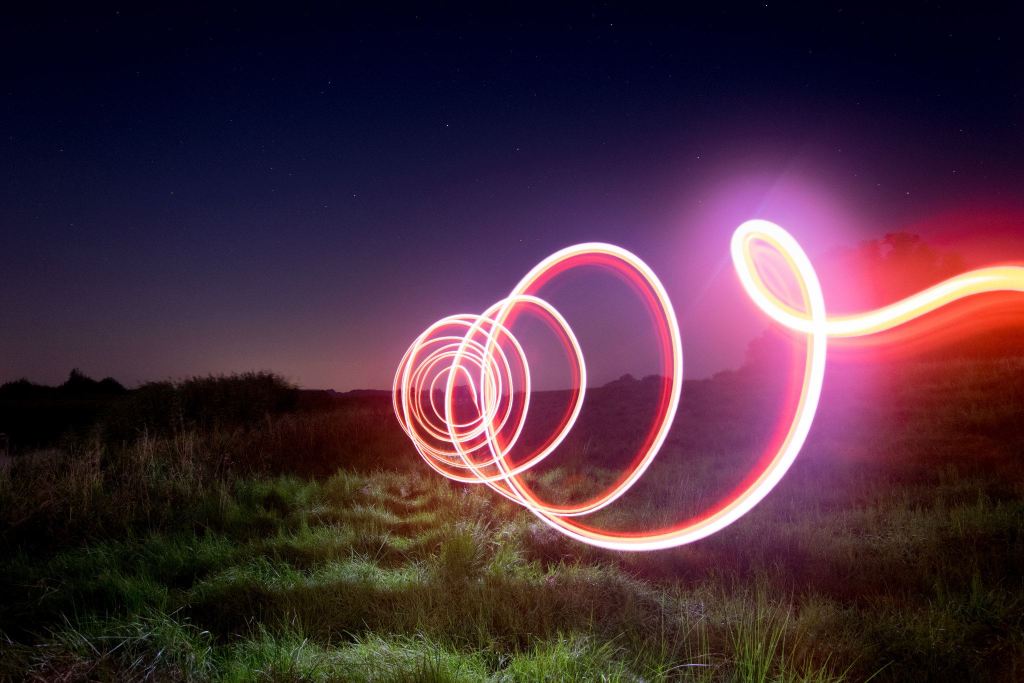
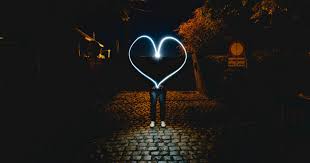
Light painting – Slow Shutter Speed/Long Exposure

Step 1: Set Your Camera on the Tripod and Set it to Live View.
This is the easiest way to make sure your composition and focus points are correct. If you have an assistant, have them stand in the location where you want the light to show up in the image. Use them as your focus point and set your focus. If you don’t have an assistant, find a chair or an object you can use as your focus point. If you’re shooting in a dark location, it’s best to use a light to ensure your focus is sharp. Just remember to cut the light out again when you start your painting.
Step 2: Set Your Camera to Manual Mode
Manual mode will give you control over the settings and exposure length. It’s best to set the ISO around 100-200 to allow for a longer exposure and reduce noise. Set your Aperture to f/5.6 and then adjust as needed.
From there you should be able to lower the shutter speed to the desired length. The length of the exposure you use will determine how much time you have to create a light design as well as the amount of ambient light that will show up in your image.
You’ll need to make sure your shutter speed is long enough to finish drawing your light painting. Stop down your aperture (to a larger f number) one increment at a time until the desired shutter speed can be achieved with acceptable results. Experiment with various exposure lengths to achieve the finished look you prefer.
Start with 10″ Sec and you will be able to go up to 30″ seconds.

Step 3: Release The Shutter and Start Painting With Light
Once the camera setting are the way you want them, you’re ready to start playing. Get into position with your flashlight and have your assistant press the shutter or use the remote trigger to release the shutter. I found setting my shutter on a delay allowed me a couple extra seconds once the shutter was released to get ready. Once the shutter is released use the flashlight to draw your design.
The longer the exposure, the more time you have to create a light design. Start with a simple circle or star then work towards more intricate designs or words. You can even play with turning the flashlight on and off to create separate letters or shapes.

Step 4: Review Your Image and Experiment
This is the beauty of working with digital cameras, you get instant results! Get creative by adding in colored lights, different light sources, or different locations for added ambient light. The sky is the limit on what kind of light painting photos you can create!

Get Inspired
Here’s just a sampling of the kinds of things you can invent, but remember, creativity is key, so be sure to do your own thing, too!


 Do some location scouting beforehand to find interesting places to create your paintings in. Photo by darkday
Add a reflection about how you found changing the settings and the difference the change of shutterspeed made to the images. (Use any of the images or notes above if you like.)
Check these out > Pablo Picasso paints with light
Challenge your skills – you can do so much with light painting and long exposures
